Evaluation is your ability to decide who stands better, both objectively and practically, and to gauge what result you are playing for: a win, draw, or loss. It encompasses several layers of judgment, from simpler factors such as material to more complex ones such as space and concreteness.
If you are just starting, first learn the basic objectives that contribute to an evaluation:
- Compare material.
- Compare piece development.
- Compare central control.
- Compare king safety.
- Compare the pawn structures.
These objectives are essential checkpoints for evaluating your games, but they are not always enough. Chess is a concrete game, and not every layer of judgment can be reduced to one simple, human-friendly category. The full evaluation framework below adds piece placement, practicality, and concreteness through worked examples.
Evaluation can also change quickly from one move to the next. It is not feasible to restart the entire process after every move. You need a clear strategy and a sense of the whole position, then you should evaluate more carefully when an imbalance changes during your calculation.
Evaluation versus calculation
It is important to discuss evaluation alongside its complementary skills so that you understand where it belongs in your thinking process. Your goal is to evaluate both the current position and the positions you anticipate through visualization and calculation. This allows you to judge where each candidate move is likely to lead.
Calculation and visualization help you understand what might appear on the board after a candidate move. Without evaluating those possible positions properly, however, you are simply calculating random lines without a clear strategic direction. This is why you need to learn the underlying skills separately, then put most of your effort into applying them together in your games.
It takes experience to know when to stop calculating and evaluate a resulting position. You could try to do it thoroughly at almost every point in a variation, but that is impractical. It can lead to time trouble and psychological problems as you repeatedly question your own judgment. The examples below therefore show not only how to evaluate a snapshot of a position, but also how to use practical heuristics that make the process manageable during a game.
The evaluation framework with an example
The position below comes from Magnus Carlsen against Sergey Dolmatov at the 2004 Aeroflot Open. The game ended after only 19 moves because Black never managed to get his king to safety.
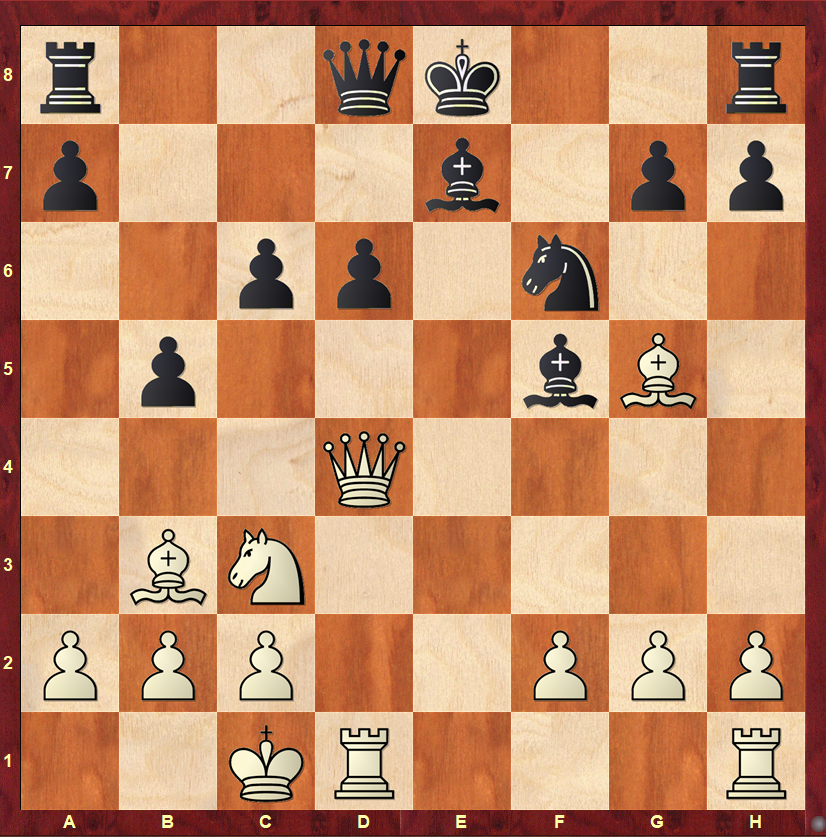
Start with the five main objectives to approximate the evaluation.
Step 1: Analyze the material piece by piece
- Queens: Both sides have one queen.
- Rooks: Both sides have two rooks.
- Bishops: Both sides have two bishops.
- Knights: Both sides have one knight.
- Pawns: Both sides have six pawns.
There is no material difference, so neither side gains an advantage from this category. We can move to the next objective.
Step 2: Compare piece development and piece placement
These are really two separate objectives, bundled together here for simplicity.
Begin by comparing how many developed pieces each side has. This tells you whether one side is underdeveloped and potentially unprepared for action. A developed piece is not merely off its starting square: it must contribute meaningfully to the position.
White has six developed pieces, excluding the h1-rook. Black has only three: the two bishops and the knight. The rest of Black's pieces are not contributing to the game yet.
From this alone, we can conclude that White has a substantial development advantage. In a direct fight, White is likely to benefit from having more pieces ready to participate.
Now compare the placement of the pieces one by one, beginning with the heavy pieces:
- Queens: White's queen is actively developed on d4 and restricts Black's improving options. Black's queen remains undeveloped on d8 and has a defensive role.
- Rooks: White's active rook on d1 pressures the d6-pawn and ties down Black's pieces. The other rooks are not contributing yet.
- Kings: White's king has castled queenside and is safely surrounded by its pieces, with no black attackers nearby. Black has not castled and has an exposed king in the center because the e-file is open.
- Bishops: Both light-squared bishops are active, but White's bishop is especially valuable because it prevents Black from castling kingside. Black's bishop on f5 does not restrict White to the same degree. White's dark-squared bishop on g5 is also more active than Black's restricted, defensive bishop on e7.
- Knights: Black's knight on f6 is well placed and helps cover the king. White's knight on c3 is also useful: it controls the central squares e4 and d5 and makes queenside expansion harder for Black.
Combining these comparisons, White is massively favored in this category. White leads in development and has the better placed pieces, while Black's king is vulnerable in the center and lacks protection. White's active pieces also prevent Black from castling and are ready to open the position.
Step 3: Compare central or flank control
Depending on the position, one side's strategy may focus on the center or one of the flanks. It is important to understand the dynamics in that area before judging the quality of the strategy.
You can begin by counting the pawns and pieces involved, but this is often tricky. A piece does not have to stand inside the target area to influence it. Bishops, rooks, and queens may act from a distance, while a piece that appears close to the action may contribute very little. Understanding how placement affects control is a skill you build through experience.
In this position, the center is where the pieces meet and the only part of the board that has opened, so it is the natural focus.
Pieces: If we count only the central files, White has two pieces on the d-file while Black has three pieces on the d- and e-files. That initially suggests a slight disadvantage for White. Once we include pieces acting toward the center, however, White adds the c3-knight and both bishops, while Black adds the f6-knight. White therefore has five pieces contributing to central control and Black has four.
Pawns: On the d- and e-files, Black has the only pawn: the pawn on d6. In the wider center, Black also has the c6-pawn while White has the f2-pawn.
Black has more central pawns, while White has slightly more piece influence. Overall, the two sides have similar central control.
Step 4: Compare king safety
King safety is another essential objective that can be assessed through several tangible principles. You already consider it when comparing the placement of the kings, but it deserves a separate step because it can outweigh the value of other pieces.
Ask:
- Has each side castled, and is castling still possible?
- How many pieces and pawns defend each king?
- How prepared is each side to attack the opposing king?
- How much counterplay does the defending side have elsewhere on the board?
We touched on these questions in Step 2. The conclusion is clear: White has a massive king-safety advantage. Black has not castled and cannot castle immediately, giving White time to open lines around the king before Black can complete development.
Step 5: Compare the pawn structures
Begin by examining the pawn placement itself and identifying weaknesses and pawn islands. Then ask how the structure supports each side's pieces and plan. Different concepts take priority at different stages of the game. In a middlegame such as this one, the relationship between pawns and pieces is especially relevant. In an endgame, fixed weaknesses, passed pawns, and pawn islands usually become more important.
Pawn support for the pieces: Black's central pawns block some of White's pieces, but they also restrict Black's own development. The bishop on e7, for example, runs directly into the d6-pawn. White has fewer central pawns, so there is less pawn support in the center.
Pawn weaknesses: White has no clear pawn weakness. Black's pawns on d6 and c6 are potential targets because White can attack them easily.
Pawn islands: Each side has two pawn islands. More importantly, the e-file is open because neither side has an e-pawn.
These factors make the pawn-structure verdict less obvious. Black has more central pawn control, but those pawns restrict Black's pieces. The uncovered e-file is also directly aligned with Black's king.
Step 6: Make the final evaluation
Combine the conclusions from the individual objectives. If the result remains unclear because the factors conflict, add the advanced considerations discussed below.
Here the evaluation is one-sided because White has an advantage in almost every important category. Material is equal, but White is massively ahead in development, piece placement, and king safety. White also has sufficient central control. Only the pawn structure is arguable, and in this middlegame it matters less than the immediate activity around Black's exposed king.
The advantages compound into a winning position for White.
Advanced evaluation: practicality and concreteness
When the five main objectives point in the same direction, the evaluation is usually straightforward. When they conflict, the position may remain inconclusive. Professional players also account for practicality and concreteness, often without consciously naming every step after years of experience.
Practicality
Sometimes one side has an overwhelming advantage in one objective, such as development, while the opponent leads in another similarly important category. You then have to consider human factors as well as the objective position.
Ask whether it is difficult for one side to find the next few moves. Does the position suit your strengths? A player who excels in tactical play may prefer a dynamic position that is easier for them to navigate than for the opponent. A strategic player may prefer calmer options with lasting positional pressure.
A good chess player must become versatile, but practical evaluation still changes with the conditions. You cannot judge the practical difficulty of a position in exactly the same way in blitz and classical chess.
Concreteness
A major difficulty in chess is determining which side truly comes out ahead when the five main objectives conflict. Evaluating a position is not only about taking a snapshot of the current board. You have to investigate what happens when both sides carry out their most natural ideas.
In the Carlsen-Dolmatov position, White has the much safer king. Black can try to castle quickly by blocking the b3-bishop with ...d5. If White has no direct breakthrough, Black may be in time to castle and consolidate. Deep calculation is needed to determine whether White can prevent that plan.
One sample idea is ...d5, Bxf6, Bxf6, Qc5, followed by Rhe1+ and a possible sacrifice on d5 while Black's king remains exposed. Another concrete variation is ...d5, Rhe1, 0-0, Qe5!, when Black cannot protect both attacked bishops.
The ability to evaluate visualized resulting positions becomes increasingly important as your level rises. The complex example below shows how calculation can resolve an initially uncertain evaluation.
How to apply the evaluation process in practical games
The application varies by level, but every player should internalize the five main objectives and use them when calculating possible variations.
You cannot ask yourself every detailed question after every move. Instead, internalize the framework into practical heuristics that make evaluation more efficient. Because you play a game from the beginning, you normally keep track of the material and do not need to recount it on every turn.
My own internalized process compresses Steps 2 through 5 into one broad comparison. I assess development, placement, king safety, control, and pawn structure together. If I am still uncertain, I calculate more deeply and use the resulting positions to clarify whether the direction of the game benefits me or my opponent.
Complex example: when calculation changes the evaluation
The following position was played in the classical game Vladimir Fedoseev versus Awonder Liang at the 2026 Rubinstein Memorial.
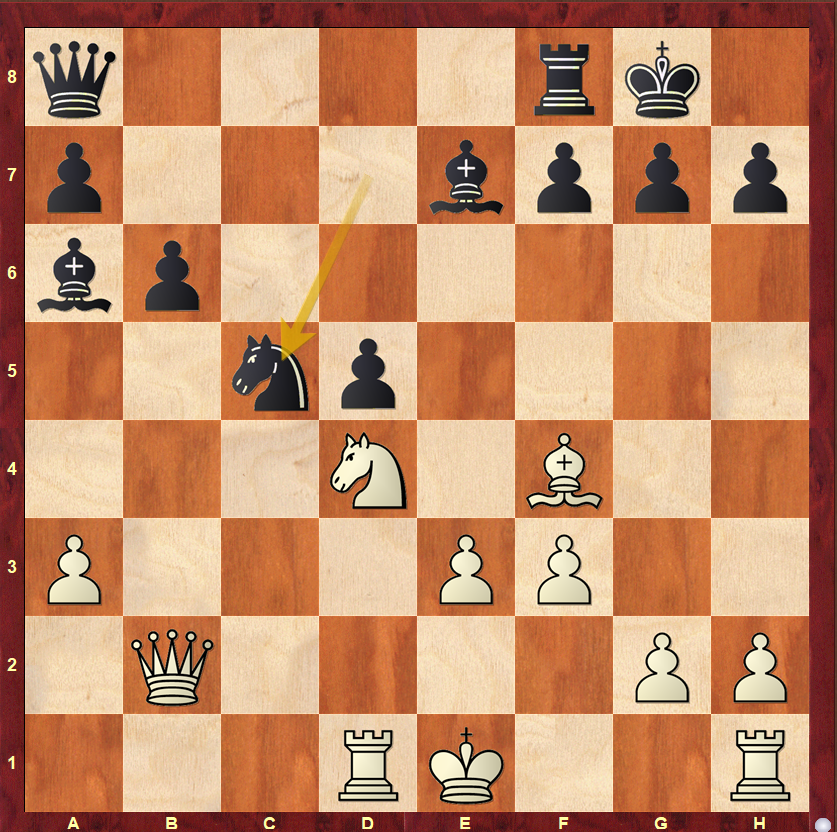
The initial five-step evaluation
1. Material: White has a rook for a valuable light-squared bishop and a pawn. The material balance therefore favors White by roughly one point.
2. Development, placement, and king safety: White has four developed pieces, while Black has five if we include the passive queen on a8. Neither queen is ideally placed and both should improve.
White's rook on d1 does useful work by guarding against the ...Nd3+ fork, while Black's rook on f8 and White's rook on h1 remain undeveloped. Black's king is safer for the moment. If White can connect the rooks or castle, however, the king should not remain a major problem because the center is fairly closed and Black's pieces are not yet well coordinated for an attack.
The bishops are comparatively well placed, although Black's bishop on a6 is especially valuable because it prevents White from castling and supports counterplay based on ...Nd3+. The knights are also reasonably placed, but Black's knight is essential to the initiative that Black received for the exchange sacrifice.
3. Pawn structure and central control: Black's pawn structure does not support the pieces particularly well, and the isolated d5-pawn could become weak in an endgame. White has a weakness on a3, but otherwise the structure is solid. White has two pawn islands and Black has three, although that distinction is not especially important here.
Both sides have three pieces contributing to the center. White has more central pawns, but the difference is not yet substantial.
At this point, the advantages are divided enough that I cannot make an immediate, confident judgment. My preliminary evaluation would be that White is somewhere between slightly better and clearly better because of the material advantage. Black's initiative restricts White's king, but it does not yet appear overwhelming because only a few pieces are contributing to the attack.
The practical and concrete questions
The uncertainty means that I have to apply the advanced steps. Can Black bring more pieces into the attack quickly? How easily can White get the king to safety while preventing ...Nd3+?
The structured thinking process now leads into candidate generation and calculation. White has the direct move 1.Nf5, which should be calculated first, as well as quieter moves such as 1.Qc2 and 1.Qb1.
After 1.Nf5 Bf6 2.Be5, the immediate 2...Nd3+ does not work, so Black can continue with 2...Qc8. White then has several candidates: 3.Nxg7, 3.Nh6+, 3.Bxf6, and 3.g4. The position is critical and requires deeper calculation.
- 3.Bxf6 Qxf5 4.Bxg7 Re8 5.Bh6 Qg6 6.Bf4 Nd3+ 7.Rxd3 Bxd3: The position is equal.
- 3.Nxg7 Bxe5 4.Qxe5 f6 5.Qg3 Nd3+: If White captures on d3, Black has at least a perpetual after ...Qc1+. Otherwise Black appears better because the knight on g7 is vulnerable and Black can move the king to h8.
- 3.Nh6+ gxh6 4.Bxf6 Nd3+ 5.Bxd3 Bg7 6.Rd8 Bxh6 7.d4: Black appears to have enough counterplay. With opposite-colored bishops, White does not have enough to claim a clear advantage.
- 3.g4 Nd3+ 4.Rxd3 Bxd3 5.Bxf6 Bxf5 6.gxf5: Black cannot recapture the piece because of checkmate, so White is winning unless there is a hidden defensive resource.
After the quieter 1.Qc2, Black has the natural ...Rc8, threatening ...Nd3+. White would have to retreat to b1 anyway, so 1.Qc2 appears inaccurate. The move 1.Qb1 is logical, but if Black can proceed slowly there is little reason to believe White retains a large advantage.
This makes me more inclined to choose 1.Nf5 and try to make the direct continuation work. After deeper calculation, I cannot find a sufficient resource against 3.g4, so White appears clearly better objectively.
The example shows how I moved from an uncertain evaluation to the conclusion that White is at least clearly better because of concrete calculation. At professional level this is an essential skill. Comparing only the five main objectives will often lead you off course when the position is forcing.
How to determine which factor matters most
The importance of each objective depends partly on the stage and nature of the game. In middlegames, development, placement, and king safety often matter more immediately than pawn structure. In endgames, king activity, passed pawns, fixed weaknesses, and pawn islands become much more important.
When some objectives favor one side and the remaining objectives favor the other, apply the advanced steps. Most often, you need deeper calculation and a clear picture of the positions that are likely to arise after both sides choose strong continuations.
Sometimes even comparing several variations will not produce a conclusive answer. At that point, make the best practical judgment you can. Your goal is not to know the position with computer certainty. It is to increase the probability of getting both the evaluation and the next move right.
Frequently asked questions about chess evaluation
What is position evaluation in chess?
Position evaluation is the process of judging which side stands better and why. A useful evaluation compares material, development, piece placement, king safety, control of important areas, and pawn structure, then checks whether concrete tactics change that initial judgment.
How do you evaluate a chess position quickly?
Begin with material, then scan development and piece activity, king safety, central or flank control, and pawn structure. In a familiar game you will already know the material balance, so the practical scan can become one broad comparison. If the factors conflict or the position contains forcing moves, calculate before making a final judgment.
What is the difference between evaluation and calculation in chess?
Calculation tells you what may happen after a candidate move. Evaluation tells you whether the position at the end of that line is favorable. The skills work together: evaluation guides which moves deserve calculation, and calculation tests whether your evaluation survives concrete play.
Is material the most important factor when evaluating a position?
Material is the clearest starting point, but it is not always the deciding factor. An exposed king, overwhelming development, trapped pieces, or a forcing attack can outweigh a material advantage. Treat material as the baseline, then test whether the position allows the stronger side to use it.
How often should you evaluate during a chess game?
Keep a general sense of the evaluation throughout the game, but do not restart a long checklist after every move. Reevaluate carefully when the pawn structure changes, pieces are exchanged, a king becomes exposed, a new tactical possibility appears, or your calculation reaches a substantially different position.
How can I improve my chess evaluation skills?
Practice on positions without seeing the engine first. Write down who you think is better, name the factors behind your verdict, choose candidate moves, and calculate the most critical line. Then compare your judgment with a strong player's explanation and the engine. The most useful question is not only whether you were wrong, but which part of your evaluation caused the error.
If incorrect evaluations repeatedly lead to mistakes in your games, use the blunder diagnosis guide to separate evaluation errors from calculation, candidate-generation, and practical-execution errors.